
Most DM screens fail for one simple reason: they hold too much stuff you never use.
If I want my screen to help at the table, I keep only the references I check often, give each panel one job, and make every insert easy to scan in 1–2 seconds. Then I split inserts into 3 groups: base, adventure, and specialty, so I can swap pages without rebuilding the whole setup.
Here’s the whole idea in plain terms:
- Track what I look up for a few sessions before printing anything
- Assign each panel one role so I know where to look
- Measure panel space first so inserts fit
- Test on plain paper before using thicker stock or sleeves
- Use dry-erase space for changing details like initiative and time
- Review panels after each arc and remove dead weight
- Link short panel notes to a campaign journal for full records
- Pack a smaller kit for travel, store play, or conventions
A lean screen works better than a crowded one. In most games, I don’t need more pages behind the screen. I need the right pages, in the right spots, with text I can read fast.
This guide is about building that setup without overloading it.
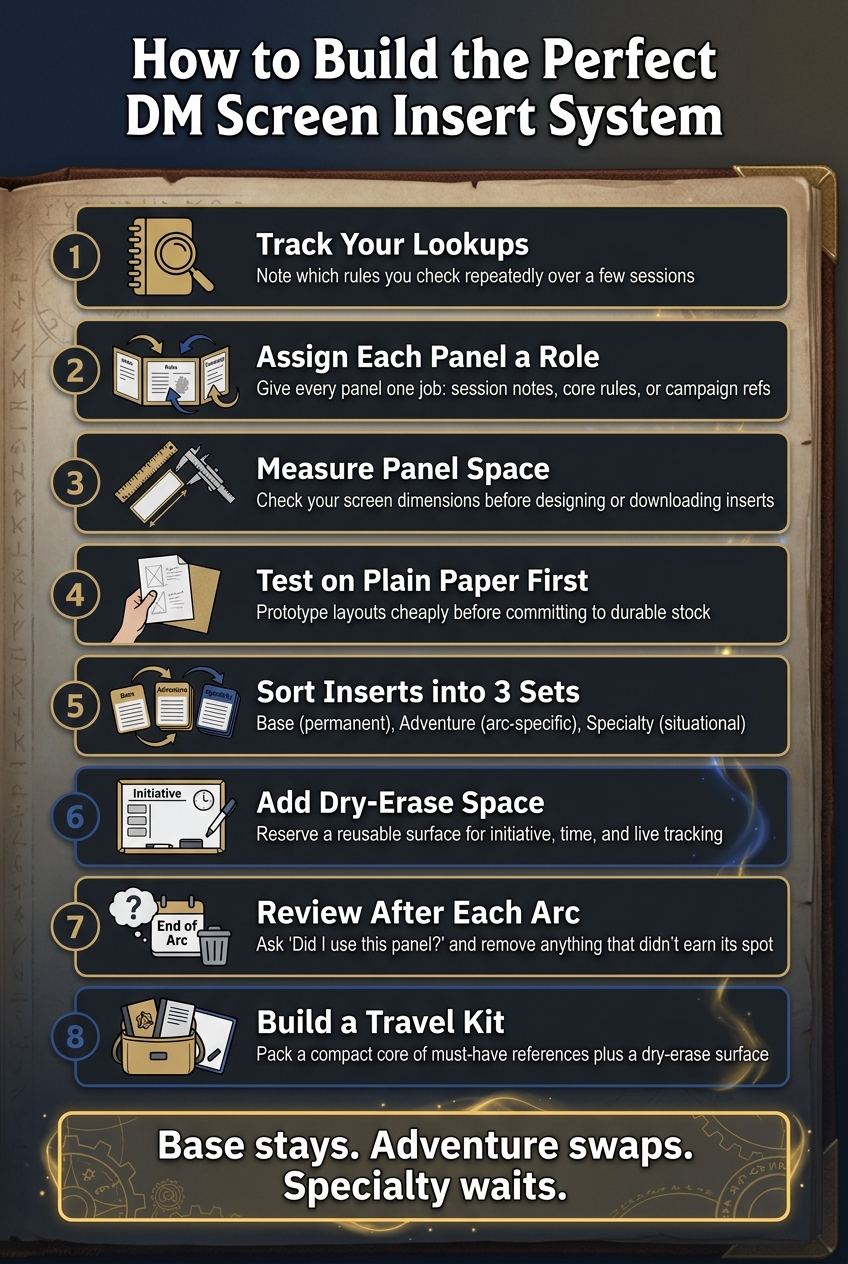
How to Build the Perfect DM Screen Insert System
Making A DM's Screen That's ACTUALLY Helpful.
sbb-itb-74d578b
Define What Your Screen Needs to Do Before Picking Inserts
Start by checking what you actually glance at during play. Before you print even one insert, ask a simple question: what do you keep stopping the game to check? Build your screen into a DM command center focused on rules and notes that interrupt the session. Everything else can live in a binder or journal instead of taking up space behind the screen.
Pick Core References Based on What You Actually Look Up
Track your lookups for a few sessions before you lock anything in. The pattern usually shows up fast. The rules you check again and again are the best fit for your screen. Leave the rest off until it earns a spot.
Once you know those repeat checks, place them on specific screen panels.
Give Each Panel a Clear Role
Give each panel one job: session notes, high-use rules, or campaign references. That keeps you from repeating the same info and makes it easier to find what you need in the moment.
After that, decide which inserts belong to the game system and which ones should move from game to game.
Separate System-Specific Inserts from Reusable General Tools
Keep system-specific inserts separate from general tools. That way, you can swap out one panel when you change games instead of rebuilding the whole screen.
Plan Layout, Print Size, and Readability for Fast Reference
Once you know what each panel is for, make sure every insert fits the screen you actually use. Even a well-planned insert can become a pain if it’s the wrong size or stuffed with tiny text. At that point, it slows the game almost as much as having no reference at all.
Match Insert Size to Your Screen Format
Before you design or download anything, measure the visible space on each panel. DM screens vary by maker, so checking the size first saves you from trimming and reprinting later.
For most U.S. printers, US Letter and half-letter are the simplest formats to use. Set each insert in portrait or landscape to match the panel itself, and leave a small margin around the edges so nothing feels cramped.
After the insert fits, trim the layout down to what you can read in a split second.
Format Each Panel for Quick Scanning
Set up each panel so your eyes can move fast. Use a clear visual order, plenty of spacing, and one repeatable layout pattern per panel. Keep the typography consistent across the whole screen, and go easy on color. It should help organize the page, not make it busier.
Test on Plain Paper, Then Upgrade Durable Panels
Start with plain copy paper when you test a new layout. It’s cheap, easy to swap out, and good for spotting problems before you commit. Once a panel earns a permanent spot, move it to heavier stock, lamination, or dry-erase pockets and sleeves. Tougher panels hold up better and stay easy to read during play.
If you track things live at the table, dry-erase pockets and sleeves are especially handy. You can slide in a printed insert and write right on the surface during the session.
Build a Swap System for Changing Sessions and Long Campaigns
A good DM screen should change with your table. Once you like the panel layout, set up a simple way to swap inserts as the campaign shifts.
Sort Inserts into Base, Adventure, and Specialty Sets
Split your inserts into three sets.
- Your base set covers core rules and go-to references that almost never change. These stay in the screen from session to session.
- Your adventure set holds pages tied to the current module or campaign arc, like NPC names or local maps. When that arc ends, those panels come out.
- Your specialty set is for narrow-use references that only matter in certain sessions.
Here’s the idea in plain terms: base stays, adventure swaps, specialty waits. That makes prep between sessions much easier. You’re changing one layer, not rebuilding the whole thing.
Use Pockets, Sleeves, Frames, or Magnetic Panels to Hold Inserts
The holder you choose affects how fast you can change panels. Pockets and sleeves, frames, and magnetic panels all work, but they support different swap speeds.
If you change inserts a lot, magnetic modular systems can make life easier and help keep the setup compact for travel. WyrmCodex uses a modular tome-style setup with magnetic accessories, a dice tower, and a refillable campaign journal.
Review and Replace Underused Panels After Each Session Arc
At the end of each session arc, take a minute to flip through your screen and ask one plain question: Did I use this panel? If the answer is no, it probably shouldn’t stay there.
Move it to your specialty set or remove it. On the flip side, panels you check all the time may deserve a permanent place in your base set. A swap system only works if you’re willing to drop references that aren’t doing much for you.
A swap-ready screen also makes campaign notes and travel setup easier to manage.
Connect Inserts to Campaign Journaling and Travel Play
Once your panels are set, tie them into the rest of your campaign notes.
Sync Panel Summaries with Your Campaign Journal
Use the screen for fast, at-a-glance info, and use the journal for the full record. On the panel, keep summaries short: a name, a role, or one defining detail.
If something shifts in the middle of a campaign, update the journal entry and swap the insert summary at the same time. That way, your table notes stay tied to the same campaign thread.
Use Dry-Erase Space for Live Session Tracking
Use dry-erase space for details that change during play. Initiative, marching order, in-world time, clue tracking, and countdowns all fit best on a reusable surface where you can update things fast and wipe them clean after the session.
Keep printed references fixed. Use dry-erase space for the parts of the table state that keep moving.
Trim Your Insert Kit for Store Play, Conventions, and Travel
A home setup doesn’t always pack well. That same split between fixed references and live notes also makes a smaller travel kit much easier to carry. For store play, conventions, and travel, build a compact core around the references you reach for every session, plus a dry-erase surface and any double-sided inserts that save space.
WyrmCodex leans into this portable setup with a tome-style format that combines a DM screen, refillable journal, and dice tower in one carry-friendly package.
Conclusion: Start Small, Refine Often, and Build Around Real Use
Start with a lean insert set. After a few sessions, the screen will show you what belongs there: the tools you keep reaching for during play, the pieces that make more sense in a swap set, and the stuff that doesn’t need space at all.
That loop of use, review, and small fixes is the whole point. Keep what earns its spot at the table.
A good screen gets better the more you use it, not the more you cram into it.
For a portable example of this approach, WyrmCodex combines a DM screen, dice tower, magnetic command panels, and refillable journal in one tome-style setup.
FAQs
How many inserts should a DM screen have?
It depends on your campaign, but three to four panels usually hit the sweet spot between reference space and keeping the table in view.
For most DMs, three panels is the practical minimum. Four panels gives you extra room for encounter notes and hidden details. If your game leans on dense encounters or several tables at once, five or more can make sense.
The bigger point isn't just panel count. It's whether you can use modular inserts and swap them in when the session calls for it.
What should go on each DM screen panel?
Put the info you use most on your screen. If you look at it more than once in a session, it should be there.
Set up panels in the same direction your eyes tend to move: left to right. Keep core combat actions and conditions near the center. Put spellcasting and saving throws on the left. Place NPC generators or environment effects on the right.
If you have extra space, use it for campaign-specific notes or swap-in inserts. Just don’t crowd the screen. Clutter slows you down.
What’s the best way to swap inserts between sessions?
Use clear sleeves or magnetic pockets so you can swap out old charts fast and slide in session-specific notes or system rules. Keep your reference sheets as digital files, so printing new copies is easy when your campaign moves into a new arc.
Between sessions, pull out anything you’re not using so your setup doesn’t get cluttered. And if your screen supports modular magnetic attachments, you can rearrange entire panels to match the flow of your current encounter.