
Most DMs do not need more prep. They need less prep, aimed at the next 3–5 scenes.
If I had to boil this article down to one point, it would be this: prep only what I’m likely to use tonight. That means I focus on five things before game time:
- Story notes: recap, party goals, opening scene, and 2–5 movable clues
- Encounters: monster stats, terrain notes, escape options, and backup scenes
- NPCs: key names, goals, secrets, and a short list of spare names
- Maps and visuals: battle maps, rough location notes, and reusable places
- Table tools: initiative tracking, condition markers, dice, rule refs, and note cards
The article also makes a clear split between session prep and campaign prep. Session prep is for tonight. Campaign prep is for later. That one shift can cut wasted work by a lot, since many groups will only hit a handful of planned beats in a single session.
Here’s the short version of what I’d keep in front of me:
| Area | What I prep | Target amount |
|---|---|---|
| Story | Recap, opening problem, anchor scenes | 3–5 scenes |
| Clues | Clues that can move between places or NPCs | 2–5 clues |
| NPCs | Key NPC notes + spare names | ~10 backup names |
| Encounters | Stat blocks, terrain, escape route | 1 note set per likely fight |
| Table setup | Maps, trackers, dice, refs | Ready before players arrive |
Bottom line: the checklist is about starting fast, finding info fast, and keeping the session moving without stuffing my notes with things I may never use.
Session Prep Checklist - Prepare for your D&D Game!
sbb-itb-74d578b
1. Prepare Story and Player-Facing Notes
These are the notes your table hears first: the recap, the opening scene, and the names they ask for tonight. Start with the notes that shape the first few minutes at the table. Once that story spine is in place, move to the rules and encounter prep.
Review Party Goals, Recap Notes, and the Opening Scene
Begin by skimming your notes from last session. Look for loose ends, goals the players said out loud, and anything you told them would matter later. Then write one short recap paragraph and use it to open the session.
Next, check your PC roster. Note each character's name, passive Perception and Insight, plus any backstory hooks that could come up tonight. After that, draft your opening scene: one scene that puts a clear problem in front of the group within the first 10 minutes[9]. Give it at least two sensory details - the smell of smoke, the sound of boots on stone - so players land in the moment right away.
Outline Scenes, Secrets, and Flexible Clues
Plan 3 to 5 anchor scenes for the session. For each one, write a single sentence about its job in the session, then note what might change based on player choices. Don't script dialogue. Don't lock in outcomes. You want direction, not a railroad.
Then prep flexible clues. Draft 2 to 5 clues that can shift between NPCs, places, or documents[6]. If the party skips the NPC who was meant to share a clue, put that same clue in a guard's gossip, a letter on a desk, or a rumor at the inn. That way, the session keeps moving even when players zig where you expected them to zag.
"Prep only what you can't improvise. Everything else is wasted work." - Anima[6]
List NPC Names, Motivations, and Backup Names
For key NPCs, keep it simple: name, role, goal, and one secret. Add one physical detail or speech habit so you can step into the character fast at the table. That's enough for a solid NPC note card.
Beyond those main NPCs, keep a backup list of about 10 names you can cross off when players decide to talk to someone you never planned for. When that happens, write down who the person is - "Thalyn - the nervous blacksmith" - so they can show up again later and still feel like part of the same world[6][2].
| NPC Type | What to Prep |
|---|---|
| Key NPC | Name, goal, secret, one voice or physical habit |
| Backup NPC | Name, one personality trait, functional role |
| Unplanned NPC | Name, 2–3 rumors (mix of true and false) |
With the story beats and voices ready, you can pull the encounters, stat blocks, and rules references those scenes will need.
2. Gather Encounters, Stat Blocks, and Rules References
DM Session Prep: Reference Format Comparison Guide
Once your story beats are locked in, shift to the nuts and bolts. Get the mechanics ready for the fights, conversations, and checks that are most likely to happen tonight.
Assemble Encounter Notes and Monster Stat Blocks
For each combat you expect to run, have the stat block ready before the players sit down. Keep an initiative tracker nearby, and add a few notes about terrain features[1][6]. There’s no need to rewrite the whole stat block. Just note the book and page number so you can grab it fast during play[6]. A page reference from Monster Manual, Volo's Guide to Monsters, or Pathfinder Bestiary does the job.
Stats alone aren’t enough, though. Add one quick note for terrain effects and one for an escape route in each fight. That small bit of prep can make enemies feel less like cardboard targets. It also helps keep combat from stalling out when a retreat makes more sense than a last stand[6].
As each scene comes into focus, pull the stat blocks and rules notes that scene is likely to use. It also helps to keep a short backup list of encounters, NPCs, or mini-scenes you can drop in if the party veers off-script[10]. The best backups are portable. If needed, you can slide them into a different location without much fuss.
Keep Core Rules Within Reach
Keep the Player's Handbook, Dungeon Master's Guide, and a monster reference close at hand[7]. The usual speed bumps are conditions, common DCs, and spell rules[1][6].
A DM screen insert or a one-page cheat sheet covers most of this. Set your common DCs before the session starts, and put them somewhere you can see at a glance. For example, DC 10 works for easy tasks, while DC 15 fits medium tasks[6].
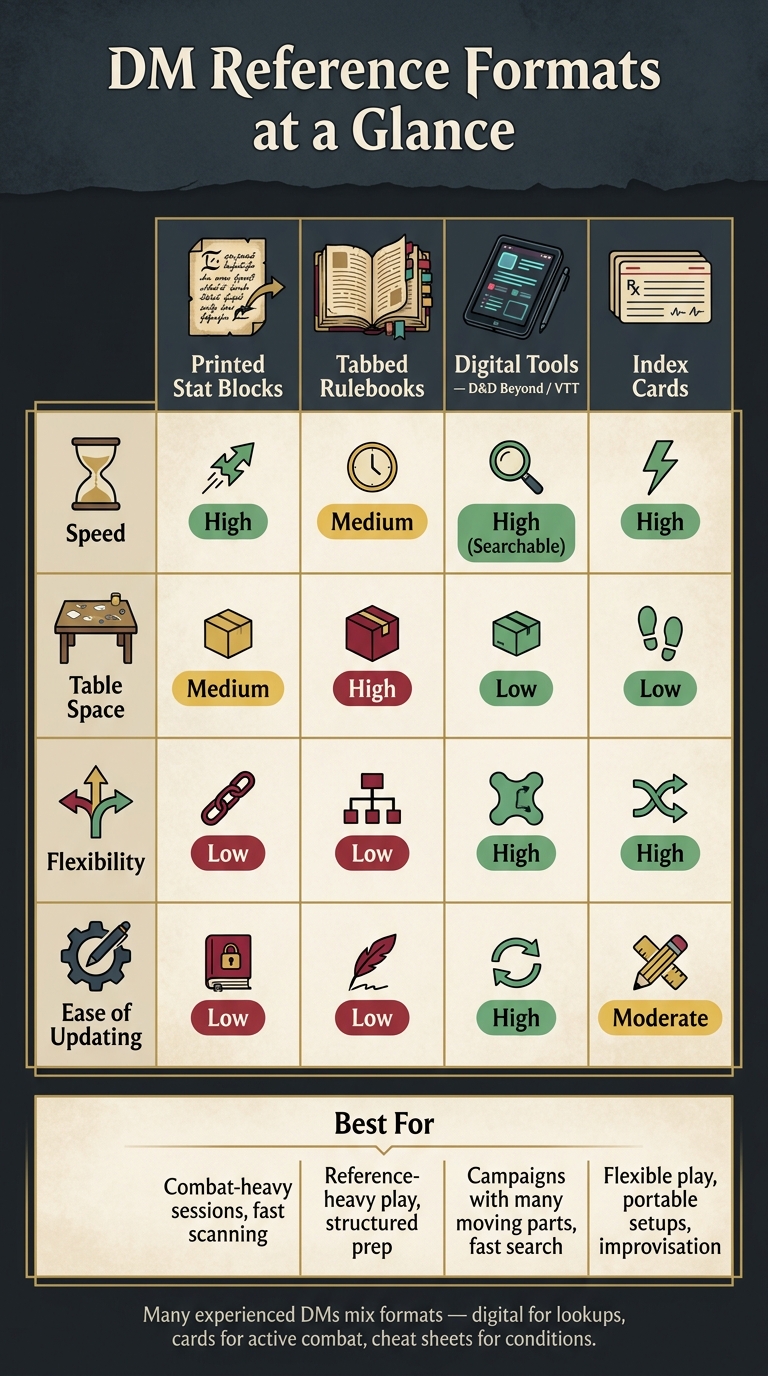
Choose a Reference Format for Fast Access
Pick the setup that matches your session and the space you have at the table.
| Format | Speed | Table Space | Flexibility | Ease of Updating |
|---|---|---|---|---|
| Printed Stat Blocks | High | Medium | Low | Low |
| Tabbed Rulebooks | Medium | High | Low | Low |
| Digital Tools (D&D Beyond/VTT) | High (Searchable) | Low | High | High |
| Index Cards | High | Low | High | Moderate |
If the session leans hard into combat, printed stat blocks or index cards are often the easiest to scan. No scrolling. No hunting through tabs. Just glance and go.
For campaigns with lots of moving parts, a searchable tool like D&D Beyond or a campaign wiki in Notion or Obsidian can save time[10][11]. Plenty of experienced DMs mix formats: index cards for monsters in play, a digital tool for spell lookups, and a cheat sheet for conditions. The best setup is the one that gets the right rule or stat in front of you fastest.
With that in place, you’re ready to set up maps, trackers, and the rest of your table gear.
3. Set Up Maps, Tracking Tools, and Table Gear
With your encounters and rules squared away, turn to the table itself: maps, trackers, and the gear you'll keep reaching for during play.
Prepare Maps, Location Notes, and Visual Aids
Once your scene notes are done, give each likely location a physical shape.
For every major place you expect the party to visit, have a map or at least a rough sketch ready. A wet-erase battle mat is a flexible pick for in-person games because you can sketch a layout on the fly if the party heads somewhere you didn't plan for [10][11]. Printed maps are a good fit for set-piece encounters where terrain plays a bigger role. If you use miniatures or tokens, keep them sorted with the map so you can get combat on the table fast.
For locations that don't have maps, jot down:
It also helps to keep a small "flex pile" of reusable locations, like a roadside camp or a generic tavern interior [10][9].
Set Up Initiative, Conditions, Hit Points, and Status Tracking
When combat begins, clear visibility beats extra complexity.
Write PC names on cards or table tents before the session starts [11]. Keep blank cards nearby for monsters or surprise NPCs. During combat, clip a condition marker to each card for effects like prone, stunned, frightened, or poisoned [5][1]. That way, everyone at the table can see status effects at a glance.
Track monster HP next to each stat block [6][11].
Check Dice, Random Tables, and Note-Taking Supplies
Finish by setting out the tools you'll want within arm's reach.
Do a quick dice check: a full polyhedral set of d4, d6, d8, d10, d%, d12, and d20, plus backup d20s for advantage rolls [11][7]. A dice tray or tower helps keep rolls contained. WyrmCodex uses an all-in-one tome setup with an integrated dice tower and DM command center.
Then put out pencils, a few index cards for mid-session notes, and any random tables you may need [11]. One-page tables for loot, weather, names, and travel encounters are especially handy. If the party takes an unexpected detour, a quick roll on a random table gives you a little breathing room and keeps the session moving [10][2].
4. Build a DM Command Center That Fits Your Style
Use your final prep pass to put your most-used references where you can grab them in a second. This step isn't about doing more prep. It's about getting to the right info faster.
Organize the Front and Back of Your DM Screen
Your DM screen does two different jobs, one on each side. The player-facing side can show artwork or a safety reminder. The DM-facing side should hold the numbers and names you check all the time: DC tables, condition summaries, NPC names, monster stats, and key PC numbers like Armor Class and Passive Perception [1][2][8].
That space is prime real estate. Use it for the things you reach for most.
Once your screen is set up, sort the rest of your tools by how often you use them. If you touch it every few minutes, keep it close. If you only need it once in a while, move it out of the way.
Use Journals, Index Cards, Magnets, and Digital Trackers Together
Each tool has a job. Let it do that job well.
Use a campaign journal for session recaps, world-building notes, and PC arc tracking [7][1]. Use index cards for information that needs to move around, like NPC details, encounter reminders, or quick location sketches [11][5]. Put magnets and condition rings on the screen or tracker so status stays visible in one place [5][7]. Digital tools like D&D Beyond or Notion work well for fast rule lookups, character sheets, and encounter building [11][7][4].
"A tool that adds stress is not a tool - it's a distraction." - Tales and Tankards [5]
A lot of DMs prep on a screen and run the session with paper, cards, and table markers. That mix often works well because it keeps search-heavy tasks digital and table-state info physical.
Example Layouts: Traditional Screen, Binder, and All-in-One Tome
Pick the format that fits the way you run your game, not the one with the longest feature list.
| Layout | Organization | Portability | Best Use |
|---|---|---|---|
| Traditional Screen | Fixed quick references; at-a-glance rules [1][3] | Often bulky; may need a dedicated bag or case [2] | Combat-heavy sessions, new DMs [1][5] |
| Binder / Notebook | Modular; swap NPC sheets and maps as needed [1][2] | Medium; can get heavy over a long campaign [8] | High-lore campaigns, structured prep [2] |
| All-in-One Tome (e.g., WyrmCodex) | Narrative-focused; campaign continuity in one place [1][8] | High; a single portable volume [2] | Flexible, improvisational play [1][8] |
WyrmCodex uses an all-in-one tome format that combines a screen, dice tower, magnetic panels, and a refillable campaign journal.
Put names, conditions, hit points, and DCs in the fastest-reach spots. Then use the rest of your layout for material you only check now and then. Done right, your command center fades into the background, and the game gets your full attention.
Conclusion: A Final Pre-Session Check Before the Game Starts
One-Minute Final Review
Before the first player sits down, do one fast pass over your setup. This shouldn't take long. You're not doing more prep here. You're just making sure everything is in place.
Then give the table a quick scan:
- Keep the last-session recap open
- Have the opening scene ready
- Make sure your NPC list is visible
- Glance at stat blocks, the initiative tracker, maps, condition markers, and rule references
That's it. One minute is enough.
Key Takeaways for Running a Smoother Session
Players will surprise you. Prep gives you a starting point and enough room to pivot when the session takes a turn.
That's what this checklist is for: less scramble, more play.
It helps cut missed details, makes behind-the-screen work faster, keeps the table neat, and leaves space for improv. Experienced DMs suggest putting your time into the parts you can't improvise - specific NPC secrets, mechanical rules, and tactical map features [6].
Once those core pieces are set, the rest happens at the table.
The checklist handles the prep. You run the session.
FAQs
How much prep is too much for one session?
Too much prep often leads to burnout. It can also make your game feel stiff when players go off in a direction you didn’t plan for.
For most Dungeon Masters, 1–3 hours of prep per session is a good middle ground.
If you’re spending 5–6 hours on a regular basis, you’re probably doing too much. A better approach is to prep a flexible framework instead of a script: NPC motivations, a few key scenes, and encounter ideas you can shift around as needed.
What if my players skip the scenes I prepared?
If players skip past what you planned, treat your notes like a safety net, not a script you have to force. Build out situations, motives, and points of conflict instead of locking yourself into one ending.
When the group heads somewhere else, pull in backup scenes or a random encounter table to keep things moving. After the session, jot down what changed, tweak your future hooks, and let your prep give you the confidence to improvise.
What should I keep behind the DM screen?
Keep the space behind the screen tight and practical. Put the things you need right away within easy reach so the game keeps moving: rules references, initiative tracking, encounter details, dice, and your adventure notes. That usually means NPC lists, stat blocks, and short scene descriptions you can scan in a second.
For setup, use whatever helps you grab info fast without snapping the table out of the moment. Good options include:
- Index cards
- Notebooks
- Binders
- Digital tablets
- Magnetic panels
- Campaign journals
- Dice towers
The goal is simple: know where everything is before the session starts, so you’re not digging for a stat block when the fight is already on.