
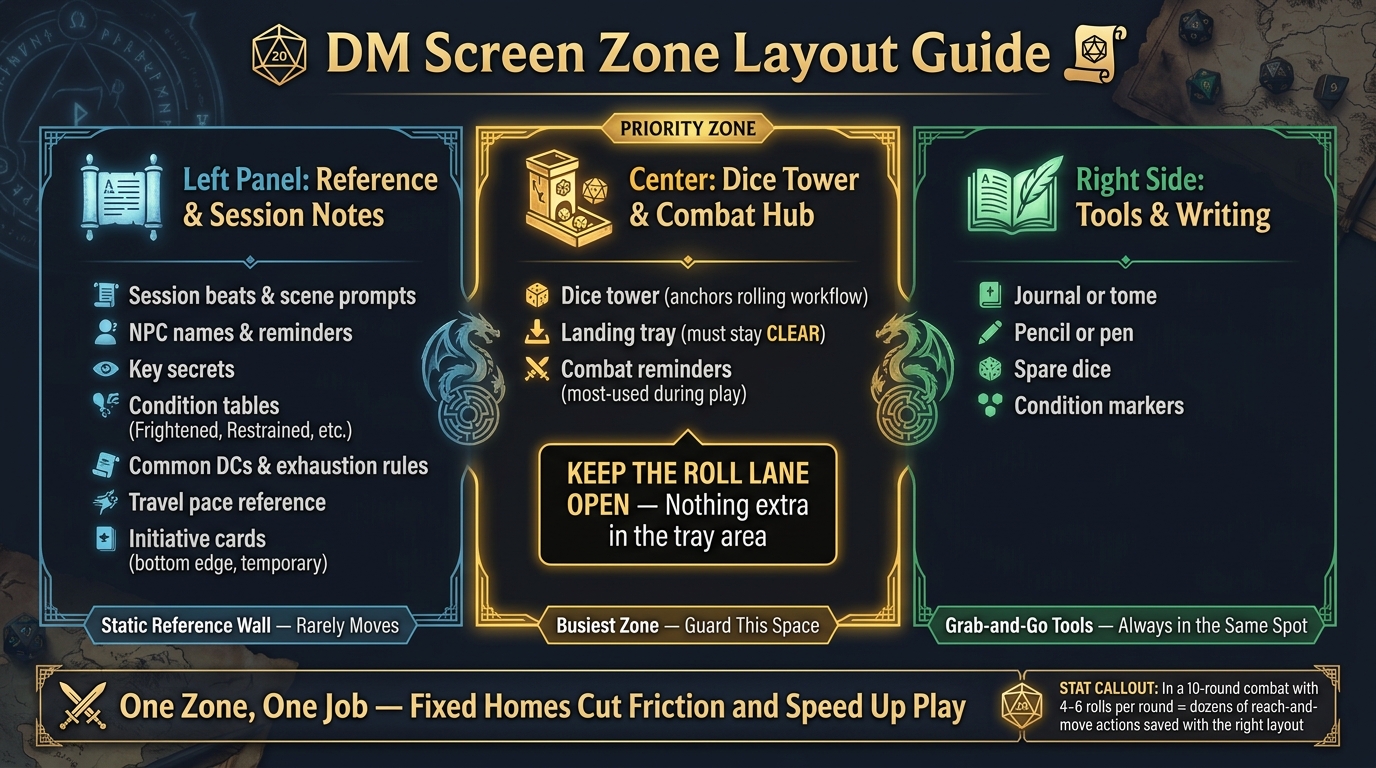
A DM screen works best when each area has one job: rules on the left, dice tower and tray in the center, and writing tools on the right.
If I set it up this way, I spend less time reaching across the table and less time moving gear out of the dice path. The main idea is simple: keep the roll lane open, keep rules where my eyes can scan them fast, and keep pencils, spare dice, and markers off to the side.
Here’s the whole setup in plain terms:
- Left side: session beats, NPC notes, secrets, condition rules, DCs, and small swap-in cards
- Center: dice tower, landing tray, and the combat reminders I check most
- Right side: journal, pencil or pen, spare dice, and condition markers
- Main rule: nothing extra goes in the tray area
- After each game: remove cards or charts I didn’t use
A setup like this matches how many DMs move during play: eyes to rules, hands to dice, then over to notes and tools. Even shaving off a few seconds per turn adds up over a long combat. In a 10-round fight with 4 to 6 checks and rolls per round, that can mean dozens of small reach-and-move actions avoided.
If I want the table to stay clean and easy to run, this is the layout I’d use.
DM Screen Zone Layout: Left, Center & Right Side Guide
DIY DM Screen | integrated dice tower!
sbb-itb-74d578b
Plan Your Base Layout Before Placing Anything
Pick a zone for each item before it ever hits the table. That small step keeps the screen easy to read and protects the space where dice need to land.
Keep Rules Visible and the Roll Zone Clear
Split reading space from rolling space. Rules, condition tables, combat reminders, and session notes should sit where you can scan them fast without shifting other gear around. Keep the landing tray open between rolls.
Common tools like pencils, spare dice, and condition markers should stay close by, but not inside the tray area. That way, you’re not digging through clutter every time the dice start flying.
Give Each Zone One Job
A layout works best when each area has a single purpose. The left side is for reference and session notes. The center is for the dice tower and landing tray. The right side is for the tools you grab all the time.
That fixed setup cuts down on searching and helps the game move faster.
Base Layout at a Glance
| Item | Zone | Reason |
|---|---|---|
| Condition tables, combat rules | Left | Quick to scan |
| Session notes, NPC names, secrets | Left | Reference only |
| Dice tower | Center | Anchors the rolling workflow |
| Landing tray | Center | Must stay clear |
| Combat reminders | Center | Used most during combat |
| Pencils | Right | Within reach, outside the tray |
| Spare dice | Right | Within reach, outside the tray |
| Condition markers | Right | Within reach, outside the tray |
With the zones marked, load the left panel first with the rules and notes you want in easy reach.
Set Up the Left Panel for Rules and Session Overview
Fill the left side from top to bottom with the notes you reach for most. Think of this panel as your static reference wall: fast to scan, and not something you keep shuffling around.
Top-Left: Session Beats, NPCs, and Secrets
Use the upper-left corner for session beats, NPC reminders, scene prompts, and key secrets. Keep each note short. A name or a one-line prompt is enough. If it needs a full paragraph, it belongs somewhere else.
A sticky note or index card for each NPC works well here. Write the name plus one table-side reminder. That’s all you need.
Middle-Left: Conditions, Checks, and Common Tables
Above the rules, keep only the notes you need for the current scene.
The middle zone is for rules you check every session: conditions like Frightened or Restrained, common Difficulty Classes (DCs), exhaustion, and travel pace. These usually don’t need to move from one session to the next, so they can stay here full-time.
Pick the rules your group uses most. The point is simple: put the rules here that tend to slow the game down when they’re not right in front of you.
Bottom-Left: Initiative Cards and Temporary References
Use the bottom-left edge for temporary references like initiative cards, note slips, and session-only cards. In WyrmCodex, magnetic panels make quick swaps clean and low-fuss. That keeps the permanent rules up top and the session-specific cards below.
Keep this area lean. One or two cards is plenty. If it starts turning into a pile, some of that stuff probably belongs in another zone.
From here, move to the center for the tower and combat rules, then use the right side for writing tools and accessories.
Set Up the Center and Right Side for Rolling, Notes, and Tools
Center: Tower, Landing Tray, and Key Combat Rules
Once the left panel is in place, set up the busiest part of your play space in the center. Put the dice tower in the middle, with the landing tray right in front of it, so every roll stays contained and easy to read.
Keep this area reserved for the tower and your main combat rules. That way, the rolling path stays clear, and you’re not reaching around loose gear every turn.
Right Side: Journal, Pencils, Spare Dice, and Condition Markers
Next, move the items you grab most often to the right. This is your tool zone: journal, pencil or pen, spare dice, and condition markers.
If you’re using a tome-style setup like WyrmCodex, this is where the refillable journal belongs. You can jot down notes, track changes, and keep your turn moving without stopping to reorganize the table.
Center vs. Side Tower Placement: Tradeoffs
For most integrated setups, putting the tower in the center works better. It keeps the rolling flow in one clear lane and leaves both sides of the screen open for reference material and tools.
If the tower sits off to one side, it can eat into space you’d rather use for notes or quick-access items. Center placement usually keeps the whole layout cleaner and easier to use.
Conclusion: Keep the Center Clear and Each Side Purposeful
Use a simple layout: reference on the left, tower and tray in the center, tools on the right.
Once those zones are in place, guard the roll lane. Keep the landing area open so every roll stays in view and nothing gets bumped out of place. Only the dice in play should sit near the tray. Everything else should stay out of that lane.
Fixed homes cut friction. When pencils, condition markers, and initiative cards always sit in the same spot, your hand goes there without thinking. WyrmCodex follows this approach in a single tome, with the journal, magnetic panels, and dice tower each given a set place.
After the session, remove anything that no longer deserves room on the screen. If a chart or reference card didn't get used, move it to a binder. A screen that holds only what you use stays faster and cleaner.
FAQs
Why put the dice tower in the center?
Placing the dice tower in the center turns it into the main hub for the actions you use most, which helps keep play smooth and in one spot.
You get one steady, easy-to-reach place for rolls, while notes and rules stay on the panels around it. That setup gives your screen a clear anchor, helps keep the table neat, and keeps rolls contained and hidden from players.
What should stay out of the tray area?
Avoid crowding the tray area with extra charts or gear you don’t need. A clear landing zone makes day-to-day use smoother and cuts down on visual mess.
Put pens, pencils, and loose accessories in a nearby caddy or compartment instead of letting them stack up on the tray. Also move anything shaky or easy to tip out of the rolling path so it doesn’t get in the way.
How often should I change my screen layout?
Update your screen layout on a regular basis so it matches your current campaign and what your group needs.
Between sessions, pull out inserts you didn’t use and swap in the info you actually looked at. The best setup can change from one adventure to the next, so stay flexible.
A short 10-minute dry run before game night can make a big difference. It’ll show you what belongs closer to your main eyeline and what can stay off to the side.