
A messy table slows every turn. I keep my game table in shape by doing three things first: splitting the table into zones, giving each item one fixed spot, and keeping food, bags, and spare gear out of active play.
If I want the session to move with fewer stops, I don’t wait until the first combat round to clean things up. I set a clear layout before the game starts, keep each player to about 24 to 30 inches of table edge, and use the middle only for what is in play right now. That cuts down on crowding, helps protect maps and minis, and makes setup and pack-up much easier.
Here’s the whole idea in plain terms:
- Divide the table into GM, player, shared, and support areas
- Keep the center clear for the map, minis, and current scene tools
- Build a tight GM station with a screen, notes, and trackers in one small area
- Use trays, holders, and bins so dice, cards, and tokens don’t spread
- Store reserve pieces off the map until they are needed
- Move drinks and snacks away from sheets, books, and painted minis
- Pack by category so the same setup is easy to rebuild at home or on the go
| Part | What I do | Why it helps |
|---|---|---|
| Table layout | Split the table into 4 zones | Stops clutter from taking over |
| Player space | Give each person 24 to 30 inches | Keeps gear from drifting |
| GM area | Keep notes, dice, and trackers in one spot | Cuts table spread on the GM side |
| Map area | Show only active pieces | Makes the board easier to read |
| Food and drinks | Keep them in a support area | Lowers spill and crumb risk |
| Travel setup | Pack items by type in labeled containers | Makes setup and cleanup simpler |
The short version: if an item is not being used, it should not be on the main table. That one rule does a lot of the work.
Below, I break down the setup into simple steps you can use for home games and travel sessions.
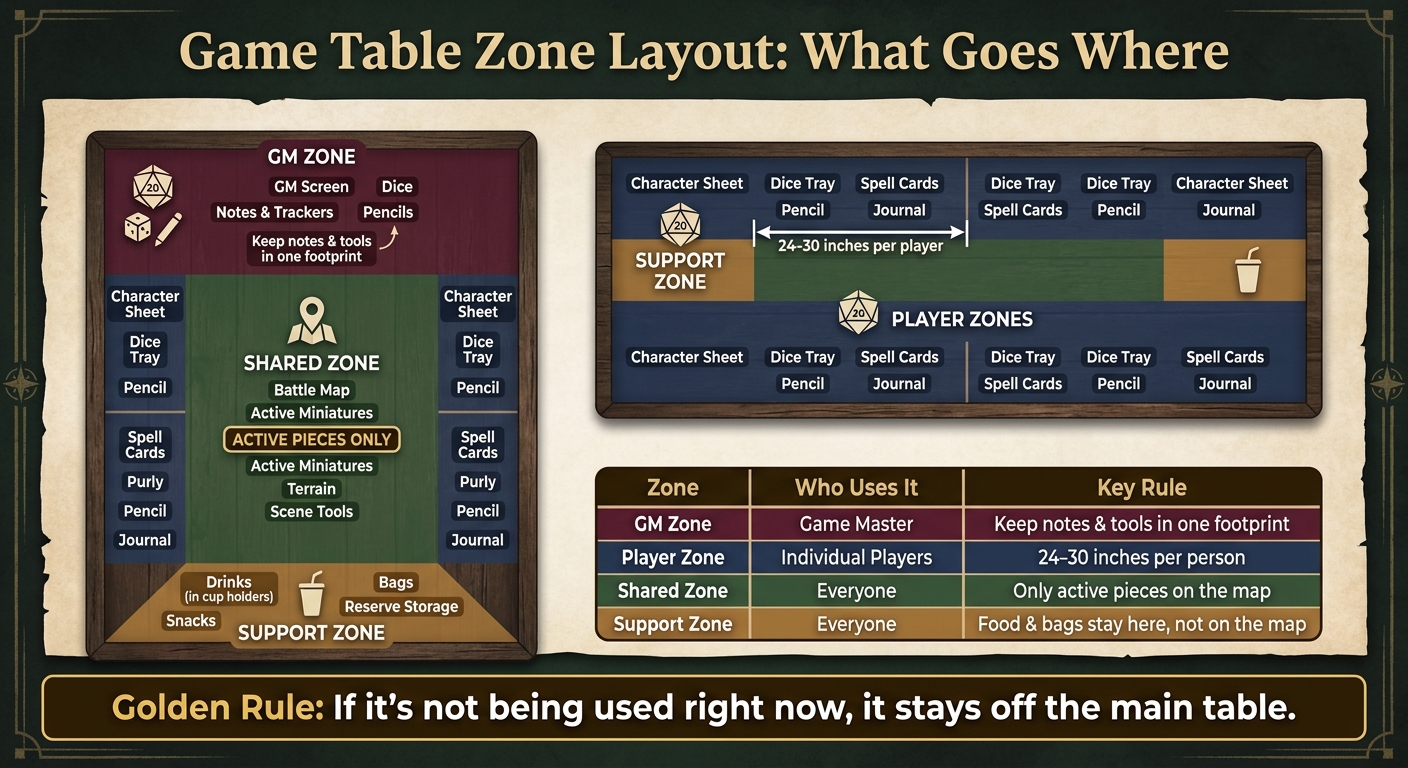
Game Table Zone Layout: What Goes Where
The Ultimate 3D printable tabletop gaming organization system
sbb-itb-74d578b
Plan the Table Layout Before the Session Starts
Set the table layout before anyone starts rolling dice. Spending a few minutes here cuts down on mid-session interruptions. It also makes the game feel smoother because everyone knows where their stuff goes. The first move is simple: split the table into clear zones.
Divide the Table Into GM, Player, Shared, and Support Zones
Break the table into four zones.
| Zone | Who Uses It | What Belongs Here |
|---|---|---|
| GM Zone | Game Master | GM screen, notes and trackers needed during play, dice, pencils |
| Player Zone | Individual players | Character sheet, dice tray, active spell cards, pencil, journal |
| Shared Zone | Everyone | Battle map, active miniatures, terrain, and combat and scene-changing tools |
| Support Zone | Everyone | Drinks, snacks, and storage that should stay out of active play |
Each player should have about 24 to 30 inches of table edge so they can stay comfortable and keep their materials from creeping into the middle of the table.[3][2] Put the GM zone slightly off-center or on a raised surface so the storyteller can see each player area and the middle map at the same time.
Use the Surface to Mark What Stays in Play
A mat or battle map helps make those zones feel real. Put the battle map or playmat in the center to show where active play happens. That visual line does a lot of work. People tend to keep bags, phones, and unused books away from the main play area when they can clearly see where the game is happening.
If something isn't being used right now, it shouldn't sit on the mat. Move extra rulebooks, spare miniatures, and bags to a shelf or under a chair instead of letting them pile up along the table edge.
Set Simple Table Rules That Limit Sprawl
Use one simple rule: if it isn't active, it stays off the table. That rule should apply to the GM too. One common issue is the GM slowly spreading books, notes, and gear farther forward and outward until the shared play space gets squeezed into whatever room is left.[1]
Keep drinks in cup holders and backpacks under chairs. Set these rules before the session starts, not halfway through when the table already looks crowded. Once that's in place, the DM can build a tighter command center around it.
Build a DM Command Center That Keeps Key Tools Within Reach
Once your zones are in place, tighten up the GM side into a small command center.
Use one of the best DM screens as the anchor for notes and references
A DM screen gives you a clean front edge for the whole setup. It separates your prep from the shared play space and keeps your side from spilling all over the table.
Only display the rules you check during play: conditions, DCs, cover, and turn order. Keep the inserts short. If you use color-coding, lookups get faster and less annoying in the middle of a session.
For initiative, ditch the loose tracking sheet. A magnetic strip or a row of name clips across the top of the screen keeps turn order in view without taking up any table space.
Once the screen holds your main references, bring the rest of your GM gear into the same footprint.
Consolidate Gear With an All-in-One Tome-Style Setup
When your gear is spread across separate pieces - a screen, dice tray, notebook, and tracker - it starts to eat into the shared play area fast. It’s the tabletop version of having ten browser tabs open when you only need three.
A tome-style setup pulls those pieces into one place. Tools like WyrmCodex combine the screen, dice tower, command panels, and campaign journal into a single footprint.
From there, shift anything extra off the table surface and onto the screen or into vertical storage.
Use Vertical and Magnetic Storage to Cut Down on Loose Components
Use vertical space before horizontal space. That one habit can save a surprising amount of room.
Magnetic pouches attached to your screen can hold dice and pens without touching the table. Clip-on trackers can handle HP and status effects without needing a separate sheet. Small stands or page tabs keep your most-used reference cards upright and easy to read instead of lying flat under everything else.
Between sessions, remove anything you didn’t use. Then give every remaining item a fixed spot.
With the GM side compressed, the next step is giving dice, minis, cards, and snacks their own places.
Assign Fixed Spots for Dice, Minis, Maps, Cards, and Snacks
A tidy GM side only works if the rest of the table doesn’t sprawl. Once the GM area is under control, give everything else a set home too.
Contain Dice and Player Tools at Each Seat
Keep each character sheet in the middle of that player’s space, with a tray for dice, pencils, and tokens right next to it. A dice tray or tower helps keep rolls off the battle map and away from minis. It also draws a clear line around each player’s gear.
Stage Minis, Tokens, and Terrain Off the Main Map
The battle map should show only what’s in play right now. Store reserve monsters, NPC tokens, and extra terrain in a labeled tray or box off to the side. When a creature is defeated, pull it off the map right away. A clear map speeds up decisions and reduces misreads [3].
Keep Reference Items and Food Away From the Play Area
Extra supplements and modules should live on a nearby shelf or side table, not on the main surface. If you need one open during play, use a book stand so it stays visible without eating up space [3].
Food and drinks need their own zone too. Keep them away from paper sheets and painted minis. Clip-on cup holders and individual snack containers help stop spills and crumbs from creeping into the play area [3].
Once each item has a fixed spot, packing up and setting back up for the next session gets a lot easier.
Build a Repeatable Setup for Home Games and Travel
Once every item has a fixed home, the next step is simple: make that setup easy to pack, move, and rebuild.
Pack by Category With Trays, Bins, and Player Kits
One of the easiest ways to cut setup time is to keep each category separate. Put dice in one container, condition markers in another, and spell cards in a third. Labeled trays or segmented boxes help a lot here because every item goes back to the same spot after each session. That means setup happens in the same order every time, instead of turning into a small scavenger hunt.
It also helps to give each player a compact kit so their gear stays together when you switch tables or play somewhere else. Another small habit that saves time? Take a photo of your ideal table layout. Before players arrive, pull it up and do a quick check. You'll spot anything missing before it slows the game down [4].
When you pack up, return items to those same labeled containers so your travel kit matches your table layout. That way, unpacking feels almost automatic. It also makes sense to remove references you won't use and pack only what stays active in the next session [3].
Use Portable Gear That Recreates the Same Layout Anywhere
Travel gear should keep the same zones in place, not make you invent a new system every time. The best portable kits do one simple job well: each category keeps the same home wherever you play.
The venue may change, but your workflow shouldn't. A rollable vinyl battle mat fits into a tube and travels easily. Modular tile systems or foldable paper maps are handy when you need fast swaps in a tight space. And a token pouch keeps encounter pieces together without adding much bulk.
For GM tools, it helps to use gear that recreates your command center as one unit. A tome-style command center, such as WyrmCodex, carries the same GM layout from home to travel.
Portable gear works best when it keeps the same table zones you already use at home.
Conclusion: Keep the Table Clear, Keep the Session Moving
A repeatable layout keeps setup fast and keeps the session on the story.
FAQs
What if my table is too small for four zones?
Prioritize vertical organization and modular tools so your setup doesn’t eat up the shared table. If four zones feel cramped, a portrait-oriented DM screen can save a lot of side-to-side space.
It also helps to use integrated systems that combine your screen, dice tower, and reference material into one compact setup. Keep only the references you actually need, and use magnetic accessories to hold gear on the screen instead of scattering it across the table.
How can I keep the map clear during combat?
Keep the map area clear with tools that cut down on tabletop clutter. Use grid or hex maps when you want precise movement, and mount initiative trackers to your screen instead of setting them on the table.
For minis and terrain, a few small swaps help a lot:
- Use color-coded tokens so players can spot things at a glance
- Add height-adjustable stands for vertical positioning
- Pick magnetic bases to keep pieces steady
Store maps, tiles, and tokens in under-table storage or slim, stackable trays until you need them. That way, the table stays open for the parts of the game that matter most.
What should go in a portable player kit?
A well-organized player kit makes the game smoother. You spend less time digging through stuff and more time actually playing.
Pack the basics first: your character sheet, pencils, dice, spell cards, and status-effect cards. Keep them where you can grab them fast.
A personal dice tray or small tower helps keep rolls under control. For miniatures, tokens, and extra dice, use a small box or pouch so they don’t end up scattered all over the table.
It also helps to bring a notebook or campaign journal for session notes, ideas, and little details you’ll want later. The main goal is simple: keep your kit compact enough to leave yourself a clean, open play space.