
A DM screen works best when it does 3 jobs at once: hide private notes, keep rules in sight, and help turns move with less delay.
If I were setting one up today, I’d focus on 4 things first:
- Pick the right screen shape so I can still see every player
- Put high-use rules in the center on my side
- Track initiative and conditions at the top where the whole table can follow along
- Keep dice, notes, books, and devices in fixed spots so I’m not hunting for them mid-session
The article’s main point is simple: the screen itself matters less than the setup. A low, wide screen often keeps sightlines better than a tall one. Swap-in inserts help if I run more than one game. And small layout choices - like where I place my dice tray, tablet, or map - can cut table friction a lot.
A few stand-out takeaways from the piece:
- Landscape screens often work better for face-to-face play
- Top-mounted initiative trackers are easier for group awareness than paper notes
- Player-facing panels should show only shared info, like art, maps, and rule reminders
- Game-specific inserts matter: fantasy combat, horror, social play, and hexcrawls all need different cheat sheets
- Good lighting and cable control keep the table clean without breaking the mood
Here’s the short version: if I can read my screen in one glance, reach my tools in one motion, and run a round without opening a book, the setup is doing its job.
| Part of the setup | What I’d keep there | Main goal |
|---|---|---|
| DM side | Rules, conditions, DC guide, session notes | Fewer rule lookups |
| Top edge | Initiative, turn order, status markers | Clear combat flow |
| Player side | Art, maps, house rules, action reminders | Shared context |
| Behind the screen | Dice, markers, stat blocks, journal | Less clutter and delay |
Quick stat from the article: the guide breaks the screen into 3 core zones and compares 4 screen formats, which makes setup choices much easier if I switch systems.
So if I want a screen that helps instead of getting in the way, I’d keep it low, focused, and built around the rules I use most.
Setting Up Your Gamemaster's Screen! (GM Tips w/ Matt Mercer)
sbb-itb-74d578b
Choose the Right Screen Format and Layout
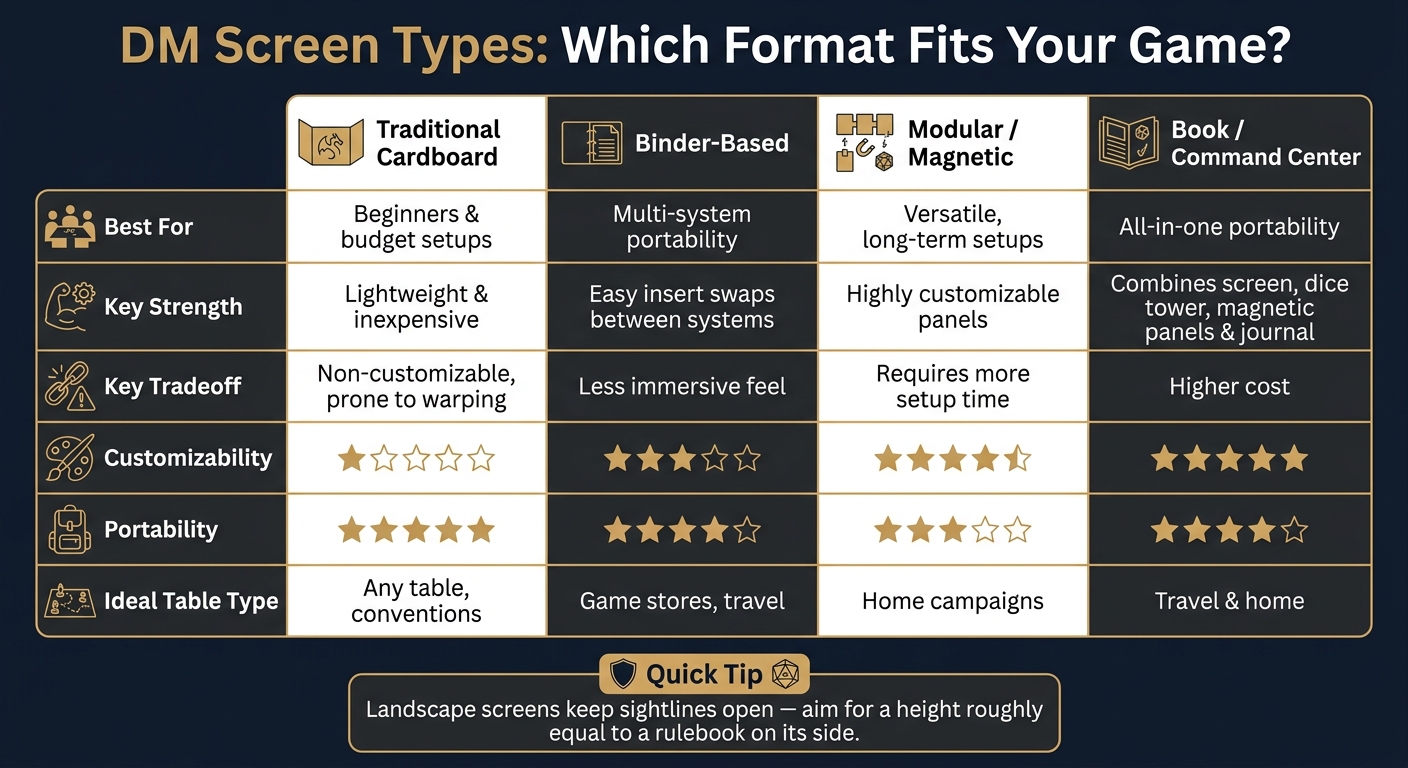
DM Screen Setup: 4 Screen Types Compared for Every Game Style
The format you choose affects everything that comes after it. If your screen is too tall, it can cut you off from the table. Too short, and your notes stay in plain view. Getting this sorted before the game starts saves a lot of annoyance once everyone sits down.
DM Screen Types and When Each One Works
Different screen types fix different problems. Traditional cardboard screens are light and low-cost, but they can warp over time and usually come with system-specific reference panels [4][3]. Binder-based screens let you swap printed inserts between systems, which makes them a smart budget pick for GMs who run more than one game [2].
Modular magnetic screens give you more control. You can rearrange panels, add dry-erase parts, and swap system inserts without rebuilding the whole setup [2][3]. That helps a lot if you change systems often or rebuild encounters from session to session. At the top end, book-style command centers like WyrmCodex roll several tools into one portable tome: a screen, LED dice tower, magnetic panels, and a campaign journal [3].
| Screen Type | Best For | Key Tradeoff |
|---|---|---|
| Traditional Cardboard | Beginners / budget setups | Lightweight and inexpensive, but non-customizable and prone to warping [4][3] |
| Binder-Based | Multi-system portability | Easy insert swaps, but less immersive [2] |
| Modular / Magnetic | Versatile, long-term setups | Highly customizable, but requires more setup time [2][3] |
| Book / Command Center | All-in-one portability | Combines a screen, dice tower, magnetic panels, and journal in one portable tome [3] |
Once you've picked the format, the next step is simple: make sure the size fits your table.
Height, Width, and Sightlines at the Table
Screen height is a tradeoff, plain and simple. Tall portrait-style screens give you more privacy, but they can block eye contact and make the table feel split in two [1][2]. Landscape screens sit lower and stretch wider, which keeps eye contact natural and helps the table feel more open. For most standard U.S. dining tables or folding tables, that's usually the better fit [1][4].
A good target is a screen about as tall as a rulebook turned on its side [2]. That usually hides your notes and dice rolls while you're seated, but still lets you see every player's face without having to stand. Before the session starts, sit down and test it. If you can't see the players on both ends of the table, the screen is too high.
Portable Setups vs. Permanent Home Setups
If you play at game stores, conventions, or different homes, setup speed matters just as much as features. Compact accordion screens and binder setups can go from bag to table in minutes, keep loose parts down, and fit better on cramped folding tables [2].
For a permanent home setup, the math changes. A larger tri-fold wooden screen or a full command-center build gives you more space to mount tools and more room for digital gear behind the panels [1][8]. Landscape orientation tends to work best here because it leaves more table space open for maps and minis while still giving you a low reference wall [1][4].
Pick the setup you can put in place fast and use every session. Once the frame works, you can stock it with the rules, trackers, and notes you grab most often.
What to Put on the Screen
Think of your screen in three parts: the DM-facing side for your private tools, the top edge for live combat tracking, and the player-facing side for things everyone should see. Each part has its own job. Set them up in that order: rules first, live tracking second, shared context last.
DM-Side References: Rules, Conditions, and Session Notes
Keep your most-used combat actions, condition reminders, and a quick difficulty scale here. The goal is simple: answer rules questions without stopping to open a book. That usually means your game's common conditions or status effects, plus a target number scale like Easy, Medium, and Hard, so you don't have to guess check DCs in the middle of play [2][6].
Put the stuff you use all the time on the left or center panel. Lighter tools, like NPC name lists or weather tables, fit better on the right. Anything you only check once in a while can live in a binder or digital note instead [2][3]. That keeps your private space lean and leaves room for the things you need every round.
Clear plastic sleeves, dry-erase surfaces, and magnetic frames help a lot here. You can swap inserts between systems in seconds. Pull out one game's condition sheet, slide in the next, and you're done.
Top-of-Screen Tracking: Initiative, Conditions, and Turn Order
Use folded cards, tents, or magnetic nameplates to track turn order and hidden stats at a glance [2][3][5]. Add small colored clips or condition rings to the cards to mark status effects like concentration or stuns [2][10]. In bigger fights, color-coding enemy groups helps keep similar monsters from blending together [5].
Once initiative is easy to read, the table can follow the round without constant reminders. Then the player side can do the rest of the work.
Player-Facing Panels: Art, Rule Reminders, and Shared Maps
The player-facing side is for shared information. Start with art - an NPC portrait or setting image - to set the mood and show that the session is live [4].
Then add shared rule reminders, like common action options, house rules, or current difficulty benchmarks [1][7]. This is also a good place for a regional map, scene handouts, and other table-wide references [2][3].
Once the screen is stocked, arrange your books, dice, and digital tools around it so you can grab them fast without losing your train of thought. Next, set up the space behind and around the screen so the rest of the table runs just as cleanly as the screen itself.
Organize the Space Behind and Around the Screen
The screen marks the line. The space around it sets the pace.
A screen hides info. But the layout around that screen decides whether the session moves cleanly or whether you spend too much time rummaging for the right card, book, or die. Put simply: what sits around you shapes how fast you can run the game.
What to Keep Within Arm's Reach Behind the Screen
Keep your go-to tools right in front of you: dice, a notepad or campaign journal, dry-erase markers, and pencils.
A dice tray or tower helps keep rolls contained. If you use tracking dice for conditions or hit points, place those right next to your tray so you don't have to reach for them in the middle of combat.
Pull the monster stat blocks or spell cards you expect to use that session and either clip them to the screen or keep them in a small box within easy reach [5][3]. For anything that comes up on the fly, use your campaign journal or notepad. Some all-in-one setups combine these pieces into one compact station.
Where to Place Rulebooks, Maps, and Digital Tools on the Table
Put the battle map directly in front of the screen so everyone has a clear view. If you can, use a riser under the map. That gives you more elbow room and makes minis easier to move [5].
Keep your dice tray on your rolling side, where your hand can find it without thought. Place core books like the D&D Player's Handbook or Pathfinder Core Rulebook on the opposite side, stacked by how often you expect to open them.
If you use a tablet or laptop, angle the screen to cut glare and keep the keyboard out of sight so players can't peek at your notes [2]. A phone or tablet holder also helps. It gets the device off the table surface and opens up more room [1][6].
Lighting, Cables, and Keeping the Table Atmosphere Intact
Good DM lighting doesn't need to ruin the mood.
Keep your area bright enough to read notes, but use a low-profile light that stays on your side of the screen and still leaves the map easy to see [5][3]. You want light where you need it, not a lamp blasting the whole table.
Cables matter more than most DMs think. Run charging cords along the table edge or behind the screen, not across the play surface. A short cable paired with a small power bank behind the screen can keep a tablet charged without a cord stretching over the battle map. The aim is simple: no tripping, no tangles, and no device getting yanked off the table mid-session.
| Accessory | Placement |
|---|---|
| Dice tray or tower | Rolling side, directly in front of you |
| Battle map | Center of table, on a riser if possible |
| Core rulebooks | Opposite side, stacked by frequency of use |
| Tablet or phone | In a holder, tilted to reduce glare |
Once the table layout is set, you can swap in the tools and references that fit the game you're running.
Refine Your Setup for Different Games and Table Needs
Swap Inserts for Combat, Horror, Narrative, and Exploration Games
Once your layout feels steady, tweak the inserts for the game you're about to run. The best screen setup isn't fixed. It changes from session to session.
A combat-heavy fantasy campaign works best when initiative tracking, creature HP/AC, condition summaries, and quick damage tables sit front and center [1][6][7]. Switch to a horror game like Call of Cthulhu, and that setup should change too. In that case, sanity loss triggers, fear and madness effects, luck rolls, and Mythos entity references matter more [9]. If you're running a narrative-first system, put NPC quick references where you can see them fast: names, traits, goals, social encounter DCs, and inspiration or other meta-currency tracking [1][6][5]. For hexcrawl play, the screen should lean into travel pace rules, weather effects, random encounter tables, area maps, and resource tracking [2][1].
One simple move helps a lot: color-code your inserts by category. Use red for combat rules, blue for exploration, green for social mechanics, and gray for general GM tools like random name tables. With the same color system every time, your eyes can jump to the right panel almost instantly [2].
After each session, pull out the sheets you didn't use, file them in a binder, and print clean replacements for any rule you still had to stop and look up [2][7].
Comparison Tables: Initiative Tools and Dice Management
These tables show the fastest setup options.
Initiative Tracking Methods
| Method | Visibility | Update Speed | Space Required |
|---|---|---|---|
| Top-of-Screen Clips | High (both sides) | Fast | Minimal |
| Dry-Erase Panels | High (GM side) | Fast | Medium |
| Digital (Tablet/Phone) | Low (GM only) | Instant | Small |
| Paper/Notebook | Low | Slow | Medium |
If you need to make a fast call, this side-by-side view helps.
Dice Management
| Method | Concealment | Noise | Fairness Perception | Footprint |
|---|---|---|---|---|
| Open Rolling | None | High | High | Large |
| Dice Tray | Partial | Low | Medium | Medium |
| Dice Tower | High | Medium | High | Small |
| Integrated LED Tower | High | Medium | High | Medium |
Conclusion: The Best DM Screen Setup Is the One You Can Run Fast
A good screen setup does three jobs. It speeds up play, keeps hidden information hidden, and adds immersion without slowing anything down.
Pick a screen format that fits your table size and how often you travel. Keep your most-used rules on the DM side at eye level. Make initiative and condition tracking easy to see so turns keep moving. Set up the space around the screen so each tool has a fixed home. Then swap inserts based on the game you're running now, not the one you ran last month.
The screen is the tool. The layout is what makes it fast.
FAQs
What size DM screen works best?
The best DM screen size strikes a balance between privacy and table presence. Most DMs go with three to four panels, which gives you enough room for notes and reference sheets without eating up your whole play area.
It should be tall enough to hide your notes and dice rolls, but still low enough for players to see your face while you're sitting down. If the screen is too tall, it can start to feel like a wall. Landscape screens often work better here because they keep things hidden without getting in the way of eye contact.
What rules should go on my screen?
Use your screen as a command center for the rules and details you check most often. Put the most-used references front and center so play keeps moving: combat actions, condition effects, common skill DCs, and turn order.
You can also add session-specific notes that save you time at the table. Think player character AC, passive Perception, encounter stats, and quick-reference notes for flowcharts, random names, factions, or calendars. If you look at it more than once in a session, it should probably live there.
How do I adapt a DM screen for different RPGs?
Build your DM screen around modularity and the details you check most often. Clear sleeves, magnetic panels, and swap-in inserts make this easy. When you move from one system to another, you can change rules, charts, and tables without rebuilding the whole thing.
Keep high-use references - like core mechanics or combat conditions - right in your main eyeline. Put only the recurring details you need again and again on the screen itself. For everything else, use a binder or a digital doc so the screen stays clean and easy to scan.