
A usable D&D trade map only needs 4 answers: what a region has in surplus, what it lacks, who controls the route, and what changes when that route fails.
If I want trade to matter at the table, I don’t track every wagon or every copper piece. I keep it to 3 to 5 regions, give each one exports, imports, and 1 local good, then mark routes by risk, tolls, and seasonal blocks. From there, I can answer price questions fast and turn shortages into quests.
Here’s the whole article in plain terms:
- Start small. Use a few regions, not the whole world.
- Tie goods to geography. Rivers move grain. Mountains move ore. Ports move cargo.
- Draw practical routes. Merchants pick safer roads, rivers, and passes, not just short ones.
- Mark choke points. Bridges, ports, and passes decide who gets paid and who gets cut off.
- Tag route danger. Use Safe, Watched, Dangerous, or Closed.
- Shift prices with access. Goods near the source cost less; scarce goods cost more.
- Put 1 faction in control. A guild, crown, or army should hold each major route or trade good.
- Track changes after each arc. War, floods, and raids should change supply and price.
What I like most about this setup is that it stays light. In most campaigns, 80% of trade tension comes from a small number of routes and goods, not from full market math. That means I can make the world feel active without slowing the session down.
A simple way to think about it: regions make pressure, routes move pressure, and disruptions turn pressure into story.
| Part | What I track | Why it matters in play |
|---|---|---|
| Region | Exports, imports, local good | Tells me what is cheap or scarce |
| Route | Path, choke point, season, risk tag | Tells me how goods move |
| Control | Guild, ruler, soldiers, raiders | Tells me who profits or interferes |
| Change | Blockade, storm, war, repair | Tells me when prices and quests shift |
So if a player asks, “Why is salt $8 per sack here when it was $3 back upriver?”, I can answer on the spot: the river port is under guard, the bridge toll doubled, and the old pass is still closed after spring floods.
That’s the core idea of the article: keep trade simple, map only what affects play, and let shortages, tolls, and faction control drive the story.
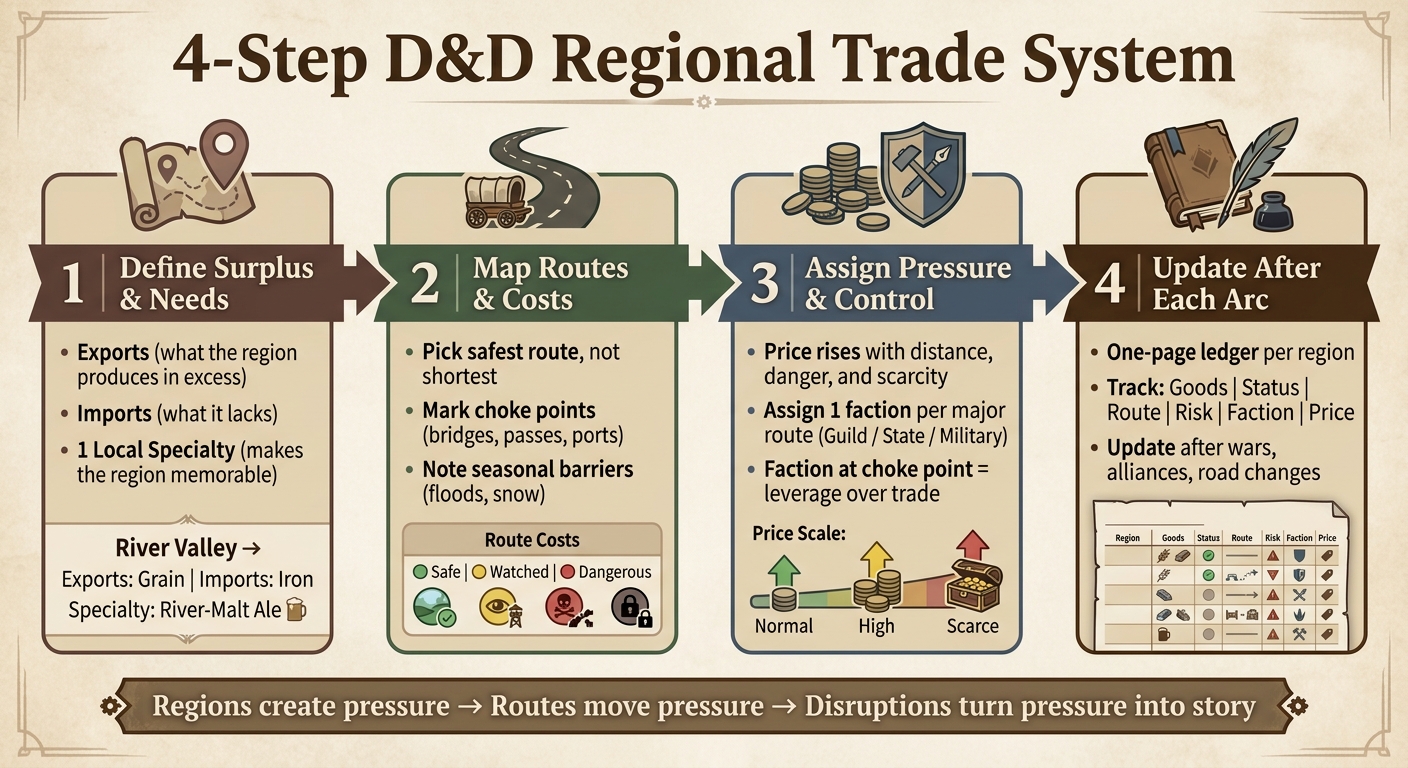
4-Step D&D Regional Trade System for Game Masters
D&D Economy Guide: Create EPIC Fantasy Trade Wars
Step 1: Define Each Region's Surplus and Needs
For each region, pin down three things: what it exports, what it imports, and one local specialty.
That gives each place a clear role in your world. It also gives players a reason to care. The local specialty is what makes a region memorable in play - a signature craft, a daily staple, or a prized good worth traveling for.
List exports, imports, and one local specialty per region
Every region gets those three entries: exports, imports, and one local specialty that sets it apart.
| Region Type | Terrain | Primary Export | Primary Import | Local Specialty |
|---|---|---|---|---|
| River Valley | Fertile floodplain | Grain, vegetables | Iron, salt | Aged river-malt ale |
| Mountain Hold | Rocky peaks, ore veins | Iron, stone, or metal goods | Grain, cloth | Dwarven rune-stamped blades |
| Coastal City | Harbor, trade winds | Manufactured goods or cargo | Food, timber | Salt-glazed navigation charts |
| Desert Settlement | Arid plateau, trade crossroads | Caravan goods, incense, or dyes | Food, water | Pressed spice bricks |
| Forest Town | Dense woodland | Lumber, pelts, or other forest products | Iron, grain | Herbal fever remedies |
Tie supply and demand to geography
This is where the map starts doing real work.
Geography decides how far goods can move and who gets to control the flow. A region on a major waterway can set the terms of trade. A mountain pass blocked by winter can cut a mining hold off from grain. A flooded river can force merchants onto a longer route overnight.
That’s the kind of thing that drives shortages, shifts prices, and kicks off quests.
Limit each region to the goods that matter in play
You don’t need to track every item a region makes or uses. Stick to the goods that can change prices, start conflict, or send players into action.
A small set per region is enough.
Those surpluses and shortages shape the trade routes you draw next.
Step 2: Draw Trade Routes and Add Travel Cost
Now figure out how those goods move. On most maps, the route won't be a straight line. Surplus and shortage tell you what moves. Routes tell you who can move it, and at what cost.
Pick the safest route, not just the shortest line on the map
A merchant doesn't pick a route by distance alone. They look at safety, tolls, and cargo weight too. A river route will often beat a mountain trail, even if it looks longer, because terrain, transport type, and safety can matter just as much as mileage.
Rivers and well-kept roads can carry heavy cargo far better than distance on its own would suggest. So when you draw routes, think like a merchant with a loaded cart. Which path would they actually take?
Your main trade hubs are the towns and cities with the most connections on the map - places where goods keep flowing through [2]. A river confluence, a port, or a crossroads city will pull trade in almost by default. Routes that bypass those hubs are often slower, more expensive, and more risky.
Mark choke points, tolls, and seasonal barriers
Bridges, mountain passes, straits, and ports are the classic choke points. Mark every one on your map. These are the places where tolls get collected, and where one blockade can shut down a whole trade corridor [1].
Seasonal barriers matter just as much. Winter snow, spring floods, or low water can reroute commerce almost overnight. When that happens, merchants may have to switch to routes that cost more or put them in greater danger.
Rate each route's risk with a simple tag
Give each route one of four tags: Safe, Watched, Dangerous, or Closed. Once the route is set, that tag gives you its danger level at a glance.
| Risk Tag | What It Means | Trade Effect |
|---|---|---|
| Safe | Patrolled, stable, low threat | Standard prices, reliable delivery |
| Watched | Faction-controlled, tolls likely | Slight price markup, possible delays |
| Dangerous | Bandits, monsters, or skirmishes | Higher prices, delayed delivery |
| Closed | Impassable | Goods unavailable or rerouted at steep cost |
Those tags affect prices right away. They also hand you easy story hooks when a route changes.
sbb-itb-74d578b
Step 3: Set Price Shifts, Factions, and Trade Pressure
Once your routes are tagged, set prices around three pressures: distance from the source, route danger, and local scarcity. Scarcity and danger push prices up. A place close to the source usually gets lower prices and better access. A place cut off by bandits, war, or a blocked pass pays more.
This gives your map some life before you start tracking any numbers. You’re not building a full market model here. You’re showing, at a glance, where goods are easy to get and where they’re painfully scarce.
Use simple price adjustments instead of full accounting
Keep the pricing light. A good near its source should be cheaper and easier to find. That same good, moved along a dangerous or blocked route, should cost more. Distance, route danger, and local scarcity can each push the price up or down.
The goal isn’t to simulate every cart, coin, and contract. The goal is to make scarcity visible fast, so players can feel the pressure without digging through bookkeeping.
Assign one faction to each major route or commodity
Once prices are set, decide who has the power to change them. Assign one controlling faction to each major route or commodity, and put that faction at the choke point where it can levy tolls, impose blockades, or control access [1].
That faction could be:
- a merchant guild
- a state power
- a military force
If you want that control to feel unstable, make major trade deals short and fixed. When the deal runs out, the faction can renegotiate terms or bring the blockade back. That keeps trade pressure in motion instead of letting it sit still for ten sessions.
Turn trade disruptions into plot hooks
When a route closes, shortages spread fast and prices spike. Players should be able to see the effects right away. Empty stalls, delayed caravans, angry buyers, and guarded warehouses all tell the story without a long speech.
Use the disruption to create immediate stakes: shortages, delays, and hard choices. Then record the current route tag and price shift in your campaign journal.
Step 4: Track It in a Campaign Journal and Update After Each Arc
You've tagged your routes, assigned factions, and set price pressure. Now put it all in one place you can check during play.
Use a one-page regional trade ledger
One page per region is plenty. Keep it as a simple table with six columns: major goods, trade status, route links, risk level, faction control, and price level. Each row should track one region's active trade data.
| Column | What to Record |
|---|---|
| Major Goods | Primary exports, imports, and one local specialty |
| Trade Status | Export or Import |
| Route Links | Connected regions by name |
| Risk Level | Safe / Contested / Blockaded |
| Faction Control | Guild, state, or military holding the route |
| Price Level | Normal / High / Scarce |
Use the route tags and price shifts from the previous step as the starting point for the ledger. Only track goods that changed since the last update. A refillable campaign journal makes it easy to keep those pages together as the campaign shifts over time.
Update the ledger after wars, alliances, and road changes
Once the ledger is set up, only update what the campaign changes. Think of regions as places and trade routes as the links between them. When a war, alliance, or disruption changes the map, update the route, the risk tag, and the prices at the same time.
Start with the major trade hubs. Changes there tend to ripple outward. If a route goes from Contested to Safe, change the risk tag, adjust the price level, and note which faction lost leverage. That way, trade pressure keeps moving after each arc.
Conclusion: 5 Details That Make Trade Feel Real
A working trade system doesn't need to be complex. It needs to stay consistent. These five details do most of the heavy lifting:
- Define surplus and need for each region, tied to its geography.
- Map practical routes, not just straight lines. Mark choke points and seasonal barriers.
- Adjust prices by access and danger, so scarcity is easy to spot.
- Assign one faction to each major route or commodity so control feels contested.
- Track changes in a campaign journal after every major arc so trade shifts with the world.
Do those five things and trade stops feeling like background flavor. It becomes something players can push on, profit from, and break. That's usually where the best D&D sessions happen.
FAQs
How many regions should I start with?
There’s no fixed number. The size of your campaign comes down to your setting and the kind of world you want to run.
You can start small with just two locations, as long as they offer different resources. That’s enough to get trade moving, because goods tend to flow from places where they’re cheap to places where people want them more.
Start by looking at two things:
- The special resources each location has
- The routes that connect them
Once those are in place, you can grow the network bit by bit as the campaign develops.
How do I turn price changes into quests?
Treat price changes as clues that something bigger is happening.
If a resource grows scarce and prices shoot up, that’s not just a line on a merchant’s ledger. It can point to conflict, sabotage, fear, or plain bad luck. And that gives you room to build adventures. Players might get hired to secure new supply lines, find out what caused the shortage, or guard trade routes from raiders.
Write these shifts into your campaign journal so they echo through the world instead of vanishing after one session. A sudden price drop, a new ore discovery, a monopoly, a counterfeiting scheme, or a market bubble can all spark direct adventure hooks and political fallout.
What should I update after a route fails?
If a trade route fails or doesn’t work out, wait one week at the local inn and let market conditions shift. After that, roll again for available buyers or sellers, then generate new loads of goods for sale.
This resets the local trade node and gives you another shot at better prices or stronger demand. A detailed campaign journal can help you track how these shifts play out over time.