
A bad table setup can slow a session in minutes. I fix that by checking 4 things before play: table shape, seat order, screen position, and lighting. If those 4 work together, players can see the map, I can read the table, and the screen stops feeling like a wall.
Here’s the short version:
- I keep the center open for maps and minis
- I set the screen low enough for eye contact
- I place dice towers, books, and trays off the main view lines
- I use room light plus a small note light to cut glare
- I do one player-seat check before the game starts
That matters because small view issues add up fast. In group play, even a 1 to 2 second pause repeated across turns can drag combat pace. And if 4 to 6 players keep leaning in to see the board, table flow breaks down fast.
A simple setup gives me three things at once: clear map views, faster table reads, and less clutter in front of players.
Quick comparison
| Part of setup | What I focus on | Common problem |
|---|---|---|
| Table shape | View angles and reach | End seats or far center spots lose sight of play |
| Seat order | Keeping heads, hands, and drinks out of the middle | Players block maps and minis |
| Screen placement | Low height and smart angle | Lost eye contact and blocked front view |
| Lighting | Paper visibility without map glare | Shiny surfaces reflect light |
| Accessories | Side placement and use-based grouping | Gear crowds the center |
If I treat the table like a shared view space instead of just a storage spot, the whole session runs with fewer stops.
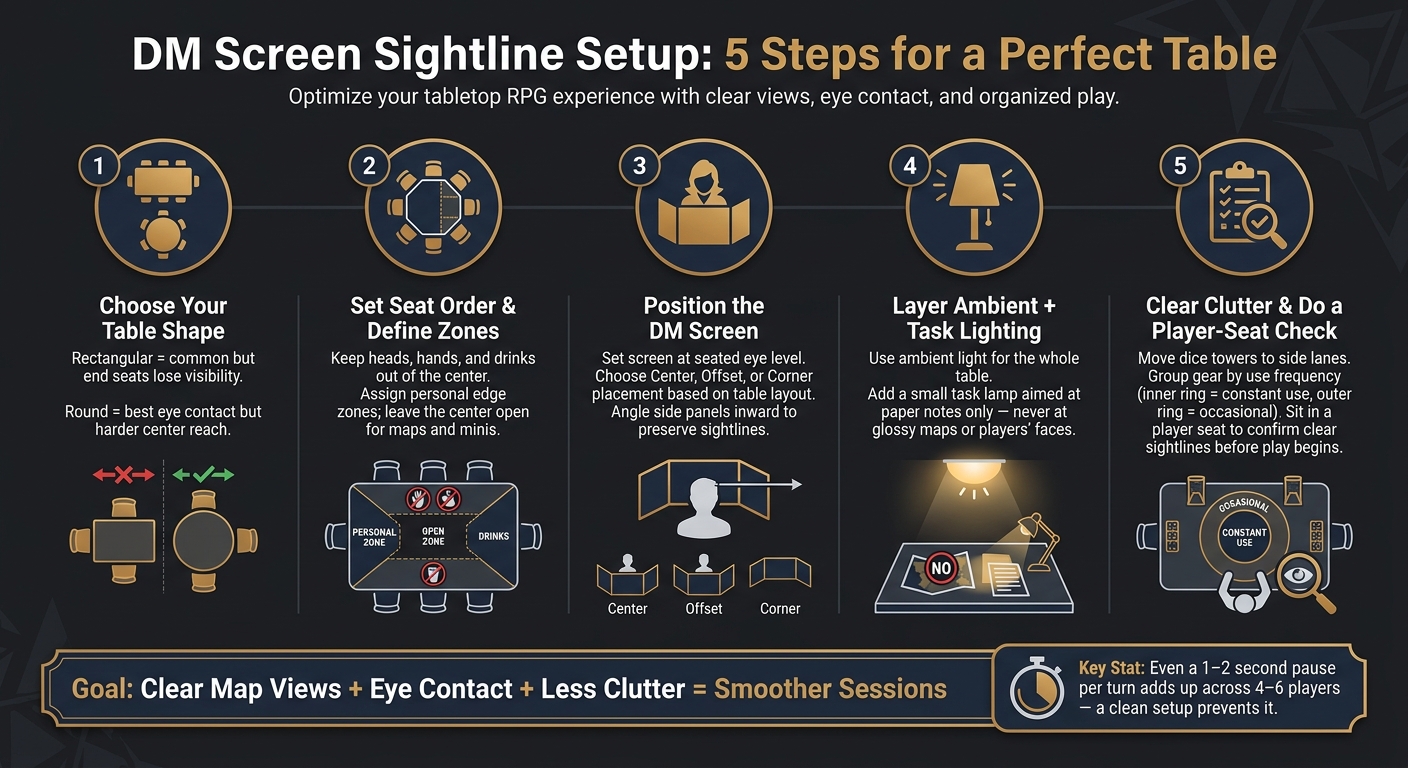
DM Screen Sightline Setup Checklist: 5 Steps Before Every Session
Setting Up Your Dungeon Master's Screen | DM Screen Tour
sbb-itb-74d578b
Start with Table Shape and Seat Order
Start with the table shape, since it controls sightlines, reach, and seating. In plain English: it sets the viewing angles that every other choice has to work around.
How Table Shape Affects Visibility and Conversation Flow
Rectangular tables are the most common, but they come with clear sightline problems. Players at the ends often lose a clean view of the screen and map, and talk can split across the table instead of moving through the whole group.
Round tables usually give the best sightlines for eye contact and group conversation, because every player faces toward the center. The downside is reach. If the table is large, the middle can be hard to access.
| Table Shape | Best For | Main Sightline Challenge |
|---|---|---|
| Rectangular | Most common setup | End seats lose visibility; conversation fractures across the table |
| Round | Eye contact and inclusive conversation | The center can be hard to reach |
Once the room’s shape is fixed, seat order decides whether those sightlines stay open during play.
Choose Seat Order to Keep Maps and Minis Visible
Once the table shape is set, place players so the map and minis stay visible from every seat.
That part matters more than people think. A good seat order keeps heads, hands, drinks, and dice trays from blocking the shared play area. If someone can’t see the map without leaning every few minutes, the setup is already working against the game.
From there, define the edges of personal and shared space so the center stays clear.
Define Player Zones and Shared Zones Before Play Begins
Give each player a personal edge zone, and leave the center open for shared maps and miniatures. That simple boundary does a lot of work. It helps stop sprawl before it starts and keeps the middle usable for everyone.
The table works best as a shared tactical space when those boundaries protect the center from the start.
Place the DM Screen at the Right Height and Angle
Once seating and play zones are set, the screen's height and position can make the table feel open - or make it feel like a wall. The aim is simple: hide your notes without blocking people, maps, or the flow of play.
Keep the Screen Low Enough for Eye Contact and Table Awareness
Set the screen to match your seated eye line. You should be able to look over the top with a quick glance, without leaning or straining. If you need to crane your neck or lean back, the screen is too tall for that setup.
Keep notes flat behind the screen instead of piling them upward. Stacks of paper push your reference material higher and make the screen feel bigger than it is.
Each small tweak should protect three things at once: eye contact, map visibility, and fast reads of the table.
Choose Center, Offset, or Corner Placement Based on Table Layout
After height, position is the next big call. Where you place the screen shapes which sightlines stay open and which ones get blocked.
| Placement | Best Use Case | Visibility | Reach | Conversation Flow |
|---|---|---|---|---|
| Center | Balanced layouts with a central map | Strong symmetry, but can block a straight-ahead view if too tall | Even reach to both sides | Good for addressing the full table evenly |
| Offset | Tables where one side needs more open map space | Opens one side for open sightlines to players | Better access to the side you use most | Helps if the DM frequently interacts with a side map or notes |
| Corner | Tight rooms or angled seating layouts | Can reduce direct front blockage, but may narrow some player angles | Good for compact setups | Works when conversation already flows diagonally across the table |
Corner placement fixes a common problem in tight rooms, where a centered screen can eat into shared play space. Go with the option that protects the broadest player sightline.
Keep Clear Lanes for Maps, Minis, and Player-Facing Information
Once the screen is in place, keep the space around it open.
Angle the side panels inward instead of leaving them flat. That helps preserve clear lanes for battle maps, minis, and player-facing reference cards. Keep cards and notes low, and keep them out of the front sightline. WyrmCodex's magnetic command panels can hold initiative trackers and reference cards off the table surface.
Control Lighting, Glare, and Accessory Placement
Even if your screen is set at the right height and angle, bad lighting or a messy table can still wreck the setup. Once the screen is in place, light and accessory placement decide whether the table stays easy to read. In plain terms: a good layout can still fall apart if the map throws glare or if gear starts crowding the center.
Balance Ambient and Task Lighting Without Washing Out the Table
Layer your lighting instead of blasting the whole table. Strong overhead light can make a laminated map look like a mirror. A better setup is to use ambient light for base visibility, then add a small task lamp for notes. Point that lamp at paper, not at glossy maps or anyone's face.
| Lighting Type | Primary Use | Readability | Glare Risk |
|---|---|---|---|
| Ambient | General room illumination | Stable baseline for the whole table | Medium - reflects off glossy surfaces |
| Task | Focused light for DM notes and trackers | High for reading fine print | Higher if aimed at laminated maps or players' eyes |
WyrmCodex's integrated dice tower includes built-in lighting that can work alongside practical room light, but it shouldn't replace it. Keep that light subtle so the table stays readable and reflections don't take over.
Place Dice Towers and Rolling Areas Outside the Main Sightline Lanes
Good lighting helps people see the table. Smart accessory placement keeps it clear.
Once the room is lit well, the next problem is physical clutter blocking sightlines. Move the dice tower to a side lane next to the central map and mini area. Put the tower or tray off to one side so the middle stays open for faces, maps, and minis.
Group Accessories by How Often You Use Them
After you've moved the big blockers out of the way, sort everything else by how often you reach for it. Think of your command area as two rings.
The inner ring should hold only the items you touch all the time, like initiative trackers, condition markers, reference cards, and pencils. The outer ring is for things you check now and then, like rulebooks. Keep the constant-use tools close, and push the rest outward. That small shift keeps the player-facing part of the table open and cuts down on visual clutter around the screen.
Build a Clean DM Command Center and Run a Final Setup Check
Once your lighting and accessories are set, do one last sweep across the front edge of the table. At this point, the main layout is already in place. Now the job is simple: clear up the player-facing view.
Keep the Player-Facing Table View Open and Intentional
From the players' side, the table should feel clear, readable, and easy to track.
Keep the map open. Make handouts easy to grab. And keep the screen low enough to frame the table instead of taking it over.
Use Integrated Tools to Cut Clutter and Protect Sightlines
After the player-facing view is open, trim down the number of loose items behind the screen. Put the tools you use most into one compact command area.
WyrmCodex follows that same approach by combining the DM screen, dice tower, refillable journal, magnetic panels, and built-in lighting into one portable tome. That setup keeps fewer items from drifting into the middle of the table during play.
Conclusion: The Setup Steps That Matter Most Before Session Start
Do one final check from the players' side. Before the session starts, confirm:
- seating
- screen height
- clear lanes
- lighting
- a clean view from a player's seat
That player-seat check helps catch blind spots you won't notice from the DM chair. It also helps the table look ready the moment the game begins - clear views, smoother flow, and a more immersive session from the first roll.
FAQs
What table shape works best for sightlines?
The best table shape comes down to how you play and how much room you have. Each one changes sightlines a bit, which matters more than people think once the map, minis, and snacks hit the table.
- Rectangular: gives the DM a clear view from the head of the table
- Round: makes eye contact easier and gives everyone equal access
- Hexagonal or octagonal: sits between the two, with a more defined DM spot and shared access
No matter the shape, the aim stays the same: see every player and keep the map in view.
How high should a DM screen be?
The ideal DM screen height comes down to a simple trade-off: hide your notes without hiding yourself.
On a standard dining table with everyone seated, 10 to 12 inches is usually the sweet spot. That height keeps your notes out of view while still letting you make eye contact and see what’s happening across the table.
If you play at a bar-height table or run games while standing, 14 to 16 inches tends to work better. You need a bit more height in those setups to block your notes from view.
Many experienced DMs also lean toward landscape screens. The big reason is simple: their lower profile makes it easier to see across the table and stay connected with the group.
How do I reduce glare on maps?
Adjust your screen or tablet so ceiling lights bounce away from your line of sight. That small change can cut down on glare fast.
If you use lamps, point them where you need them as task lighting instead of washing the whole area with light. Broad overhead light often creates bright hot spots that make the screen harder to see.
You can also soften harsh bulbs with diffusers. And if glare is still a problem, non-glare screen finishes or protective sleeves can help reduce reflections on the encounter area.